Meyer Lemon Chicken

Hello friends!

I don’t know about you, but one of the things I try to avoid doing is stopping in at the grocery store on my way home.  “Oh, I’ll just pop in and pick up ____” I innocently think.

Wrong.

“Did you find everything ok?” the nice cashier will inevitably ask as I struggle to hoist my overloaded basket up on the conveyor belt.  Little do they know I probably went in for one or two items, and walked out with a basket full of items I may or (more likely) may not need.  While I’m very grateful to have a plethora of grocery stores in every direction, the reality is I could benefit from streamlining my shopping and cooking process.

Enter Sprout! This Vancouver-based company popped onto the grocery delivery scene and has a goal of helping fix the food chain.  They have established partnerships with local farmers, and – through their innovative business model – have found a way to get local food to hungry consumers (like me! and probably like you!) in a way that’s never been done before.  With a no food waste practice, door stop delivery, and top notch products, I knew this was something I could get behind.

I was fortunate enough to receive a mystery bag of goodies from the friendly folks at Sprout, and carte blanche to play around.  Let’s get cooking!


20171128_191159

One of the ingredients in my mystery bag was boneless skinless chicken breasts.  A weeknight special for many busy households, I knew I could go in 4872+ different directions…but sometimes simple is best.  I had a few Meyer lemons in the fridge, and half of a bunch of parsley…so Meyer lemon chicken it was!

No recipe per-say, but here’s the method I used if you want to follow along in your kitchen (or mine, if you’re free and want to come cook me dinner. Ha!)

I pounded the chicken breasts and cut them so they’d cook faster, then dredged them in seasoned flour.  I did a quick pan fry just to get some surface colour, and then let them hang out on their own plate for a few minutes.  No need to wait for them to fully cook at this stage in the game, as they’ll have a chance to finish cooking later.

20171128_192645

To the same pan the chicken was browning in, I added one thinly sliced onion and a Meyer lemon.  I took out most of the seeds, but left a few in for whimsy.

Side note: have you ever had a Meyer lemon? They’re the best.  If you can’t find them, a regular lemon will work just fine – you just might want to add an extra squeeze or two of honey since Meyer’s are much sweeter than other varieties.

I also added a few minced cloves of garlic, because – why not?!

20171128_192813_HDR

Once the onion and lemons were starting to get soft, I put the chicken back on top, and deglazed the pan with some chicken stock. Smelling good!

20171128_193311_HDR

I then added the zest and juice of another Meyer lemon, a squeeze of honey, and another splash of chicken stock.  After 10 minutes with the lid on, the chicken was fully cooked but still tender.

20171128_194555_Burst01

Cooked, but not done.  Many one-pot wonders benefit tremendously from a knob of butter, an extra squeeze of lemon or lime, and some fresh herbs at the end to brighten up the sauce.

Once I had tasted the sauce for seasoning, I plated the dish up over some steamed rice.

20171128_194925

The lemons almost melted into the sauce, which was both sweet and sour.  It was declared a winner, and it was on the table in less time than it would have taken me to stop at the store and pick up food on my way home.

Life changing!


Raindrops on Roses…

… and whiskers on kittens
Bright copper kettles and warm woolen mittens
Brown paper packages tied up with strings
These are a few of my favorite things!

(Thank you Maria, you can go home to the Alps now. Or just exit Stage Left.)

I have heard that there is a strange phenomenon amongst couples everywhere.  My sources tell me that a man must never, ever, under ANY circumstance buy a woman any tool, gadget, device, appliance, or thingamabob that can be used in the kitchen.  I imagine the same rule also applies to the laundry room.  The only exception to this unspoken “rule” is that Kitchen Aid stand mixers are exempt and can be given for a birthday, anniversary, Christmas, or any random Tuesday. 

I hate this rule.  It makes no sense to me.  First of all, this rule is rooted in so many gender stereotypes its crazy.  Who is to say that a woman is or isn’t allowed to buy a man a kitchen tool or appliance? At the end of the day, if someone – regardless of gender – wants to give someone else a gift, shouldn’t he or she be able to receive it graciously instead of reprimanding the gift giver? Besides, this dumb “rule” suggests that if someone is a foodie and counts cooking and/or baking as a hobby, then you should instead buy them a sweater.  Because, in case you hadn’t heard, everyone needs a new Christmas sweater.

Friends, I believe its time for a revolution – a time where we can give and receive gifts wholeheartedly, without reservation or fear of judgement.  Where a woman can buy a man a whisk and a man can buy a woman a hammer.  Where the focus of Christmas isn’t what loot you did or didn’t get, but instead on the things that really matter.

Pretty sure I just heard an amen.  I know you’re with me!

In any event, if you’re looking for a few ideas for what to give to the resident foodie on your list, here are some of my favourites.  Let me know what yours are, and we can expand the list together. 

In no particular order:

1) Silpat Baking Mat:

These non-stick baking mats are fantastic – I line my cookie sheets with them every time I make cookies, and suddenly even the oldest cookie sheets produce the most beautifully browned cookies, every.single.time. It’s practically a facelift for bakeware. Amazing.  Also saves parchment paper, so perfect for a baker who wants to be more green.  Or eat more cookies without having to buy new cookie sheets.  I’ll let you guess which category I fall into.

2.) Cookie Dough Scoops, aka Dishers:

If you’re going to be making more cookies, you NEED these in your drawer – I have 3 different sizes, and they are fantastic.  My Mom started using these eons ago (she was very progressive), and my friends used to always wonder why her cookies always looked perfect.  Dishers ensure that your cookies are always the same size, so they bake evenly and look great.  They also can be used for portioning truffles, cake pops, muffins, etc.  Just don’t use them for a really stiff batter or ice cream – they are not indestructible.  However, they are fixed easily with a little bit of elbow grease from either yourself of someone who wants you to make more cookies.

3.) Microplane Zester:

We’ve spoken on more than one occasion about how much of a flavour boost a bit of citrus zest can give food.  These babies actually are based on a woodworking rasp – they’re extremely sharp but also safe. Trust me, it’s better for your relationship and food if you have separate kitchen and woodworking tools.  Don’t ask me how I know this.

4.) Digital Food Scale:

I know I’ve discussed this many times, but once you start baking with a scale you’ll never go back.  Not only is it much more accurate, but it’s also easier.  I can’t be the only one that hates washing a million measuring cups!  I use my scale daily – whether I’m baking bread or weighing chicken to keep my portion sizes in check, I couldn’t do without mine. 

5.) Immersion Blender:

This little gem is one of my favourites, and not just because its red! It is SO much easier to puree soups or sauces when you don’t have to put anything in your blender and puree it in batches, and you save yourself from dirtying more dishes.  I love mine so much I gave away my regular blender in the summer, and haven’t looked back.  As an added bonus, it takes up a lot less room in your cupboards, and can fall under the “power tool” category.  Just ask my Mom.

6.) Dutch Oven:

These enamel-coated cast iron pots can only be described as workhorses – they are an amazing cooking vessel for everything from soups and stews to bread and casseroles.  They have a tight-fitting lid that has little knobs on the inside that allow condensation to drip down on the food as it cooks – in other words, its self-basting.  I have 2 of these that I use more than any of my other pots or pans combined, and have given several as gifts.

If you’d like to give me one as a gift and have an extra $400 kicking around, there is a turquoise Le Crueset one that has my name on it. 

7.) Instant Espresso Powder:


Many years ago, my Mom started adding this to her chocolate chip cookies and they went to a whole new level.  Adding a bit of espresso powder really elevates the flavour profile of anything with chocolate in it – I add it to brownies, icing, cake, cereal, you name it.  Delicious!

8.) Peanut Butter:

I LOVE me some peanut butter.  On toast, with an apple, on a spoon or my arm – it doesn’t matter.  I will eat it anytime, in any form.  I love it pretty much any time of day.  It can be used for so many more applications than just toast or cookies – try stirring a spoonful into a soup to make it West African inspired, or make homemade peanut butter cups for someone who you know is a fan.  Warning – they will fall in love with you, so be careful who you cook for.  There are so many fantastic gourmet peanut butters out there – vanilla cranberry anyone? – that the peanut butter fan on your list would be thrilled with.  Orrrr….may I suggest a date to the Whole Foods peanut butter grinding bar? Seriously one of the highlights of my life thus far. 

If you’re having relationship troubles, please feel free to contact me for advice – but only if he or she is a peanut butter fan.  Anything outside of that is not in my parameters of experience, and therefore is best left to the experts on Bravo.

9.) Yoga Pants:

I hate to be the bearer of bad news, but in case you haven’t heard or personally experienced, I consider it my duty to warn you.   There is an epidemic all across the nation whereby thousands of calories have started living in cooks and professional eaters closets and dressers, sewing the seams on our clothes tighter and tighter.  There tends to be an alarmingly high incidence rate in the colder months, but don’t fret – I have the cure.  It has been scientifically proven* that calories are allergic to yoga pants.  Go get one, or ten pairs, today.  Until we catch these darn calories, I’m looking out for ya.

*tested by me, through trial and error. 

10.) The Missing Ingredient Subscription:

How fabulous is THIS – every month, you can receive a goodie box with 4-5 different product and ingredient samples, along with a recipe and chefs tips so you have ideas on how to use your new treasures.  You can sign up for a 1, 3, or 6 month subscription by going to missingingredient.ca, so head on over today – it just may the gift that keeps on giving, since you’re likely to get at least one dinner invitation out of giving this to a lucky recipient.

I could go on and on, but I’ll keep it short and sweet for now (that’s a first, huh?!?!) .  I’d love to know what some of your favourites are, so comment below and let me know!

Until we meet again,

xoxo

Funfetti Pancakes

(Alternate title: Have you eaten your hydrogenated oils today?) 

I may or may not be known to have some rather strong opinions about certain foods.  Ask me my opinion on butter vs.margarine, for example, and you will never wonder how I feel about the issue…or sugar vs. aspartame, or bacon vs. just about anything. I also have been known to picket in the grocery aisles that contain pre-made mixes of any kind, and to spend hours on end making something I could buy simply based on the principal that homemade is always better.  Yes, I’m “that girl” and I sometimes hate me too.

Except sometimes, I break my own rules.  Sometimes for good reasons, other times not.  Some might say I’m fickle; I say I’m human. Shh, don’t tell anyone, ok?

In case you don’t believe me, here is an excerpt from real conversation R and I had recently:

Me: (babbling intelligently discussing something of high importance)

R: You’re so funny.

Me: Me, funny?!?!  What’s that supposed to mean?!?! I’m not being funny!!! I’m being serious, THANK YOU VERY MUCH!

R: You’re very funny.  All the time. Including right now.

Me: I don’t agree.

R: Well, you are.  You’re always either “haha funny” or peculuar funny.

Me. Hmm.  Please pass the margarine.

(end of conversation, beginning of heart disease)

In all seriousness, while I DO believe that homemade is best, I also sometimes cheat and use something out of convenience, cost, and/or Scottish guilt.  This recipe I’m about to show you is what happens when all 3 of those things get together for a party (In other words, when sleeping in is important, cake mixes are on sale for 88 cents each, and you feel guilty throwing something out). Go ahead, put your pride, common sense, and health-conscious ego aside and join me for breakfast…you know you want to!


Go ahead and raid your pantry for Bisquick, cake mix, milk, eggs, vanilla, sprinkles.  Don’re pretend you don’t have those items on hand at all times!  

Pre-heat your griddle to medium-high heat while you introduce all of the batter ingredients to each other.

 1 c Bisquick, please meet 1 c cake mix, 2 eggs, 1 c milk, and 1 t vanilla.  Go ahead and mingle, but don’t get too friendly.

Oh look, the sprinkles are here!  All 3T of them!

You know the drill from here on in – ladle the batter onto the preheated and greased griddle, being sure to have some touch the sides of the griddle and therefore diminish any hopes, dreams, or aspirations of perfectly round pancakes.


And when the surface is dotted with bubbles, flip the pancakes over and continue cooking until they’re golden brown.


Yum!

Stack these babies up high, and dust with icing sugar and more sprinkles (obviously) before digging in.  Or, if you’re not watching your girlish figure, drizzle with an icing-sugar glaze, too.

Oh look, it’s a party on my plate!


 And a perfect breakfast in celebration of a certain someone’s 1 month birthday…

… even if this post is 2 months late going up and the birthday girl doesn’t have teeth 🙂

And on that note, please pass the margarine and Diet Coke. I’m a little thirsty.

P.S. If you feel guilty serving your family cake for breakfast, give them Cheerios and eat these once they’ve all left the house.  Take it from me, it’s sometimes worth it.

(Hello Dolly!) Swalty Chocolate Bars

Well hello there, thanks for stopping by!

I spent the last week in Vegas for a company trip, and upon returning home late on Friday night I knew I probably wouldn’t have the energy to do much on Saturday except catch up on sleep.  When a friend invited me to her house for a BBQ, I wanted to accept but knew I couldn’t go empty-handed.  I did a quick survey of my fridge and knew I would have to decide between either (a) going to the grocery store to pick up ingredients to make a dessert, or (b) making do with what I had on hand, even if that meant making something without butter, eggs, or fresh fruit.  I’m never one to back down from a challenge, so I darted into my walk-in pantry (aka storage room) and contemplated my options.  Besides, I wanted to have a nap and going to the grocery store would cut into my precious sleeping time.

You should also know that this dilemma was further complicated by the fact that the hostess of said-BBQ was my lovely hairdresser Wendy, which meant that I couldn’t just show up; I had to show up and look half-decent.  In other words, I couldn’t spend long cooking; I had to do my hair!

Hmm…what to make, what to make.  I started grabbing random pantry ingredients, since the contents of my fridge were rather pathetic – a cake mix (embarrassing but true; I’m a hoarder, remember?), some marshmallows, and chocolate chips for good measure.  A can of petite diced tomatoes rounded out the mix, and with my arms full I sauntered into the kitchen ready to create something edible without having to change out of my sweats to go to the grocery store.

Once in the kitchen, I surveyed my goods, and made the executive decision to make a pan of gooey bar cookie/brownies/whatchamacallits.  Everyone loves chocolate, I reasoned, and a pan full of something would be less finicky to make than drop cookies.  I needed all the time I could get for my nap and hair, after all.

I vaguely recalled that Hello Dolly bars are always a hit at parties, and wondered if I could replicate something similar using what I had on hand.  I scrummaged around and found some shredded coconut and a bag of chopped walnuts in the freezer, and unearthed a can of sweetened condensed milk from the pantry. How this stuff gets here, I’ll never know, but on occasions like this one I’m always grateful to not have to leave my house or pick up TimBits.   I preheated the oven to 350 degrees, ditched the marshmallows and tomatoes, armed myself with an apron and spatula, and got to work!

I began by mixing the dry cake mix with 1/2 c of canola oil, until it formed a dough.  As a sidenote, have you ever made cookies using a cake mix?  I would have probably done that, if I had eggs or butter or the desire to get dressed and leave my house.

Next, I ate 1/4 of the dough patted the dough into a 9×13″ pan that had been lined with parchment paper.

If the dough looks glossy greasy, its because it is.  No way around that one, folks.  This was NOT a situation where I was trying to make something healthy; it was a situation where I was trying to make something quickly so I could do my hair.

It’s all about priorities, after all.

Once I made peace with the grease, I then sprinkled 1 c each of coconut, chopped walnuts, and chocolate chips on top of the chocolate base…

…and then poured a can of sweetened condensed milk, otherwise known as nectar of the South, evenly on top.

Sweet, sweet, goodness.

It was at this point that I stared at the pan that was before me; the pan that contained enough sugar to put anyone into a diabetic coma, and wanted to add another layer of complexity.  Since I adore anything that is sweet and salty (or swalty), I recalled the chocolate covered caramel pretzel rods that I love so dearly (and therefore never make), and knew instantly that I needed to add a salty element to these bars.  I dashed into my pantry again, and emerged exactly 11.27 seconds later with a bag of these beauties:

Oh happy day!  I smashed up 10 or so, using the bowl from the chocolate batter base and the jar of coconut since I try to avoid doing dishes at all costs.

I put the pretzel pieces over the sweetened condensed milk, and gently pressed them in so they’d stay put. And not end up on my hips by way of my mouth, since we all know that pretzels like to travel.

I popped the whole lot in the oven, jumped in the shower, and in 25 minutes pulled a pan of pure goodness out of the oven.  I left them to cool, and quickly got ready to head out.

A few hours later, after we were all stuffed with grilled chicken and fabulous side dishes, it was time for dessert.

(I’d show you a picture of the pan when it just came out of the oven, but it looks almost identical to the pre-oven shot so just use your imagination, ok?)

I nervously cut into the pan, not sure what to expect.

They cut cleanly; that was a good sign.

With the disclaimer that this was a last-minute throw together type dessert, I quickly summoned the children to do some quality control prior to placing the bars on a plate and bringing them to the adult table.  The children approved – 6 year olds have discerning palates, in case you weren’t aware – and deemed them “safe” for the grown-ups.

You guys.  These.Are. Awesome.  They are sweet, salty, rich, and decadent.  They are serious. Cut them into small pieces, or have insulin on stand-by. They were referred to as “the best dessert I’ve ever had”, and R told me the only time I could make them again was for special occasions, like winning the lottery.  Yes, they’re THAT good.  Make them for your next BBQ with your hairdresser, or your sister, or your neighbour, or The Bachelorette.

And while you’re at it, don’t forget to make sure your hair looks good!

Indian Coconut Chicken Curry

Have you ever seen Hoarders or Extreme Couponing?  I don’t watch a lot of TV, but I have seen a few episodes of both shows in my day.  As a sidenote, I’ve found it to be quite effective to clean out your closet while watching Hoarders, but that’s another blog post for another time.  While I’m far from a (true) Hoarder or Couponer, I often occasionally find myself stockpiling things…because, well, you just never know when you might need 23 bottles of mustard.  What can I say, I like a good deal.

Can I let you in on a little secret? I think I may have a tendency towards being a pantry and condiment hoarder.  For reasons 90% of you will probably never understand, I sleep better at night if I have 32 types* of rice in the pantry and 59 opened jars* of random stuff things I can’t live without in my fridge.  The great thing about this is that I seldom have to run out to the grocery store for a teaspoon of something, but the downside is that I run out of storage if I’m not careful.  In my defense, I only have 1 fridge, do not have a deep freezer, and avoid Costco like the plague.  See if you can figure that one out!

(Actual numbers may vary; numbers are for illustrative purposes only).

I felt desperate inspired tonight to use up a few random odds and sods and call them dinner.  I had a few chicken thighs to use up, along with a wilting bunch of cilantro and an apple that was as big as a cats head.  A few more ingredients joined in, and dinner was served.  It was SO good that I wanted to share it with all of you, so I hope you enjoy 🙂

The cast of characters:

Image

Skinless chicken thighs (I suppose you could leave the skin on if you’re not watching your girlish figure), onion, bell peppers (whatever colours you want, except for green since they’re horrendous), garlic, ginger, curry powder, cinnamon, chili powder, tumeric, mango chutney, coconut milk, lime, cilantro, and an apple.

Let’s get started, shall we?

I’m all about multi-tasking, so I figured that as long as I had to spend a few minutes chopping vegetables I might as well make the chicken do some work.  I made a quick spice rub (tumeric, chili powder, cinnamon, curry powder, salt and pepper) and massaged the chicken thighs until they were good and relaxed.

Image

Now, I know what some of you are wondering: why chicken thighs? Why not chicken breasts? Well folks, without going into details of my life over the last few months, lets just say that I’ve eaten a lot of chicken breasts for the last 126 days.  I mean, a LOT.  While I like chicken, I think I reached the point where I maxed out on boneless skinless chicken breasts.   Sure, they’re quick, convenient, and healthy, but sometimes a girl just needs to change things up, you know? However, if you have not eaten your lifetime supply of boneless skinless chicken breasts yet and you’d prefer to use them, knock yourself out.  Not literally of course; I don’t want to be responsible for that.  If you’d rather use tofu…well, then maybe you SHOULD knock yourself out first; it will be less painful for all of us that way.

Oh wait, what’s that? You’re wondering how this would taste with bacon?  Well, I don’t have too much to say about that except I’m not married, and open to proposals.

Moving on…

Chop up your veggies – I had 3 peppers in my fridge so I used a bit of each, along with a small-ish onion, a few cloves of garlic, and a knob of ginger.

Image

Set the veggies aside, and go put your feet up for another 10 minutes or so.  Go on, you deserve it!

Heat up a touch of oil (in a pan that has a lid, ideally), and brown the chicken thighs on both sides.  Smelling good in here!

Image

Remove the chicken from the pan, and add the onions and peppers into the pan. Saute them for a few minutes to soften them up, then add the ginger and garlic and saute for another minute or so.

Image

See all those brown bits? Those are FLAVOUR so don’t you dare wash your pan now!

Add the chicken back in, along with the browned chicken thighs, some coconut milk, water, and mango chutney.  Bring everything to a boil then reduce it to a simmer for a few minutes while you chop an apple and zest a lime.

Image

I used a gigantic Fuji apple, because 2 weeks ago I bought a 5-lb bag of them and then discovered that they do not even come close to comparing to my beloved Pink Ladies.   Seemed like a good idea at the time…

All together now!

Image

Simmer with the lid on for about 20 minutes.  Before you go put your feet up again though, make sure you make a pot of basmati rice to soak up all of the wonderful juices!

Bonus points if you make coconut basmati rice.

After 20-ish minutes, the chicken should be cooked so go ahead and chop up a few tablespoons of cilantro (from the wilting $0.79 bunch that you’re prepared to go to heroic lengths to use up) and toss it in.

Image

Get a spoon and taste for seasonings.  Are you happy with it?  Dip your spoon in again just to double-check.  Repeat as much as necessary.

Are you ready to eat yet?!?!  I know I sure am!

Serve up the chicken on a bed of spinach (if you’re feeling healthy) and that basmati rice that is ready to go.

Image

Hungry yet?

Here’s another one, just to whet your appetite:

Image

I know I was.  So I didn’t take a mid-meal shot, but I knew you’d understand.

Especially after you make this for yourself, dish up a steaming bowl of goodness, and watch Hoarders or Extreme Couponers.  The only thing this was missing was some naan bread, so please learn from my mistakes.

And now, the final kicker: a RECIPE!

(If you know me in real life, you’ll know why that’s ironic. If you don’t know me, just come introduce yourself to me – I’m the one hanging out in Aisle 4 in the grocery store on Monday, Wednesday, and Friday afternoons).

Indian Coconut Chicken Curry

*Serves 2 – 4 people

4 chicken thighs (either bone-in or boneless)

1/2 t chili powder

1 t curry powder

1/4 t cinnamon

1/4 t tumeric

1/4 t kosher salt

1/4 t pepper

1 T oil

1 small onion, chopped

1 bell pepper, chopped

1 T minced ginger

2 cloves garlic, chopped

1-2 T spicy mango chutney

1/2 c coconut milk+ 1/2 c water (OR 1 c light coconut milk…use the extra to make rice)

1 large apple or mango, peeled and chopped

zest of 1 lime

2T chopped cilantro

1. Mix together the chili powder, curry powder, cinnamon, tumeric, salt, and pepper.  Massage onto chicken thighs, and set aside for 15-20 minutes.

2. Heat oil in a pan, and brown chicken on both sides.  Remove from the pan, and set aside.

3. Saute onion and peppers until softened, then add garlic and ginger.  Saute for another minute or two.

4. Add the chicken back to the pan with the coconut milk, water, and mango chutney.  Bring to a boil, then reduce the heat, cover, and simmer for 5 minutes.

5. Add the apple (or mango…or both if you’re feeling adventurous!) and lime zest.  Cover and simmer for 20 more minutes.

6. Add cilantro, taste for seasonings, and serve on a bed of basmati rice. Enjoy!

You’re welcome.

Any guesses?

A sneak peak at what I made this week…let’s just say it was a first!

Image


Happy Valentines Day!

(p.s. recipe for baked chocolate donuts coming soon…)

Greek Orange Muffins

When my siblings and I were children (5 years ago, in case you were wondering), my Dad thought the timing was appropriate to fill us in on a bit of our family history.  He told us a sombre tale of a battle that our Scottish ancestors had with the Greeks in the 1800’s.  I’ll save you the details in hopes you will be able to sleep tonight, but let’s just say from that point onwards we felt a weighty responsibility, no, obligation, to our ancestors to never, ever, under any circumstances, eat Greek food.  In fact, one day my sister was out for lunch with my aunt and was horrified when my aunt suggested a local Greek place for lunch – how could she not know?!?!!?  My aunt, being the considerate person that she is, immediately called my mom to find out why on earth Jennie was so adamant about not eating at a Greek restaurant. Unbeknownst to our impressionable little minds, my lovely father simply didn’t care for chicken souvlaki and had made up the battlefield story so that we would agree to go to Swiss Chalet instead of asking to try somewhere new.

Funny guy, he is.  Creative, too.  I’m not sure if he ever has, or will ever, eat Greek food by choice, but I sure think of him whenever I do.

The other day, I felt like baking, but I also wanted to use up at least one of the 6 tubs of Greek yogurt that was in my fridge, courtesy of a great sale and going to the grocery store hungry.  My Dad may not like Greek food, but I’m pretty sure he’d like these muffins – they’re moist, tender, refreshing, and have more protein thanks to the generous amount of yogurt in them.  I think he’d approve, and maybe even think they’re worth going to battle for.

Ready? Here we go!

Image

Greek yogurt, eggs, olive oil, honey, vanilla, sugar, cake and pastry flour, baking powder, salt, and an orange.

To get started, sift the dry ingredients together and set aside.  I somehow neglected to take a picture of 1.5 c of cake and pastry flour, 1 T baking powder, and 1/2 t salt in a bowl, but you can just imagine how riveting it was.  Please don’t unsubscribe over this!

Next, zest a small orange (about 1 t worth) and add to 1/2 c sugar.

Image

Smoosh everything around, so that the essential oils in the orange zest have a chance to make friends with the sugar.

And of course, it smells AMAZING!

Image

With the rest of the wet ingredients, you can either add directly to the sugar (if you thought ahead enough to use a bigger bowl) or in a separate bowl if you consider washing dishes one of your top 5 hobbies.

Image

Whisk up 2 c Greek yogurt (I prefer 2%), 2 eggs, 1/4 c mild olive oil, 1/4 c honey (use a good quality, local honey if you can – I used Orange Blossom, which inspired the orange tone in these muffins), 1 t vanilla, and 2 T of orange juice.  You can either juice the orange you just zested, or, if you’re like me, eat that orange or a snack and use the Tropicana in your fridge.

Add the wet ingredients to the dry…

Image

Gently stir everything together just until the dry ingredients are acquainted with the wet ones.  Remember, no one likes tough muffins!

Image

After 24 minutes at 350 degrees, the battle was declared over!

Image

Or perhaps, a new battle was just beginning…one that involves a dozen muffins calling your name.  Oh my.  I surrender. Just don’t tell my Dad, ok?

Next up…souvlaki, anyone?

(Wannabe Vegan) Zucchini Bread

My name is Jaclyn and I’m a wannabe vegan.

(Hi, Jaclyn)

Sigh…it’s true.  Sometimes, I flirt with veganism.  In fact, just last night, R* and I had a conversation about it.  It went a little something like this:

Me: I think I’m going to become a vegan.

R: Oh no, not again…(rolls eyes)…why on earth would you want to do that?

Me: Oh, I think it would be good for me. And the environment.

R:  So you wouldn’t eat any dairy, eggs, meat, or fish? Wouldn’t that be difficult?

Me: Well, I’m not supposed to eat dairy, so that’s one less thing to give up.  How hard could it be?

R: True.  But what about bacon and butter?

Me: Good point.  Can I still be considered a vegan if I eat bacon and butter?

R: No.  That doesn’t count. If you eat those things you’re not a true vegan.

Me: Hmm.  Fine.  Guess I’ll be a wannabe vegan then.

*True story; names have been changed to protect the innocent.

In all seriousness, I do think that I could adapt to a vegan diet, or a mostly vegan diet with the occasional slice of double-smoked bacon and smear of fresh creamery butter, of course.  It would be an adjustment, but not an impossible one.

However, as you may have picked up on by now, I love to bake.  I’ve been unsure about how to adapt many of my favourite recipes and create new ones that don’t include eggs or dairy and are still mouth-watering good.  There are many vegan substitutes for dairy (soymilk, almond milk, and the like), but eggs? That’s a whole different animal.  Literally, I suppose.

However, I am never one to back down from a challenge.  I am also never one to allow a 69-cent zucchini perish in my fridge, so I did some experimenting and here’s what I came up with.  Wannabe vegan with me?

Oh good, I was hoping you’d say yes! Here’s what we’ll be playing with today:

Flour (I’m using all-purpose and whole-wheat spelt), baking soda, baking powder, salt, cinnamon, nutmeg, cloves, ground flax-seed, buttermilk, coconut oil, applesauce, brown sugar, white sugar, vanilla, zucchini, winter squash (optional), walnuts or pecans (optional).

In my extensive research on vegan baking over the years, I’ve found that many sources recommend using a “flax egg”.  Essentially, ground flaxseed is mixed with warm water and left to sit for 10 minutes or so until it becomes gelatinous.

Easy enough, right?

I dutifully ground up my flaxseed, using my trusty Magic Bullet.  I used to use my coffee grinder, but after a few rather nutty cups of Pike Place I learned my lesson.

However, I’m a wannabe vegan, not a full-blown one.  I am, however, full-blown Scottish, so I wasn’t going to let the buttermilk in my fridge go bad while I used (gasp!) water.

Buttermilk flax egg? Don’t mind if I do.

I whirled up 3 T of ground flaxseed meal with 9T of buttermilk (that’s 1/2 c + 1T, in case you’re wondering), and began to doubt whether or not I should quickly run to the store for eggs while the oven was pre-heating.

(Side note: maybe this bread should be called “I’m too lazy to run to the store since its raining and too frugal to let my buttermilk go bad and what on earth am I going to do with this zucchini that is knocking on death’s door? bread”.  I think that has a nice ring to it, don’t you?)

One look at my fuzzy slippers and sweats and the decision was easy.  I left the buttermilk and the flax-seed to its own devices, and got started on the dry ingredients.  With fingers crossed, of course.  And toes.

Sorry, true vegans.  I promise the rest of the recipe doesn’t contain any more dairy, eggs, or bacon.  At least, not this round.  Can’t make any promises for (Wannabe Vegan) Zucchini Bread 2.0.

Since I like to complicate things, I figured since I was making something practically vegan, I might as well also make it almost healthy.  So, I used a combination of whole wheat and all-purpose flour, but you can use whatever you have on hand.

I’m trying to deplete my 13 types of flour, can you tell?

In the mix:

1.5 c AP flour
1.5 c whole wheat or spelt flour
1 1/2 teaspoons baking soda
1/2 teaspoon baking powder
1 teaspoon salt
2 teaspoons ground cinnamon
1/2 teaspoon fresh grated nutmeg
¼ tsp ground cloves

Give it a stir and set it aside.

Next, the wet ingredients!

Grab yourself some coconut oil and melt it down – 1/3 of a cup or so.  If you’d prefer, you can use a neutral flavoured oil instead.  If you’re feeling particularly rebellious, you can use melted butter.  Off the record, of course.

Add the oil to a bowl, and then dump in the rest of the wet ingredients:

If you’re thinking that’s not a lot of oil, you’re right – I wannabe healthy, after all! Besides, I had exactly ⅔ c of homemade (cinnamon) applesauce in my fridge that didn’t want to be left out, so I figured I could cut the oil down considerably from a typical quick bread.  I also wanted to be mindful of the sugar, as many quick breads are deliciously sweet but sometimes more cake than breakfast material.  I ended up adding 2/3 c each of brown and white sugar, and found the bread perfectly sweetened for my (terribly jaded) taste buds.  Throw the buttermilk-flax (wannabe) egg in with this, and you’re good to go.

Oh yes, and I also added the about 2 t vanilla. Obviously.  Everything is better with vanilla.

Before I introduced the wet and dry ingredients to each other, I grated up my zucchini – all 69-cents of it.

Houston, we have a problem: apparently I needed $1.38 worth of zucchini, as I could only get 1 c worth and I knew just by looking at it that I probably needed double the amount for the amount of batter I was making.

Kabocha squash (aka Japanese Pumpkin) to the rescue!

I chose this because it’s sweet and mild, and I figured it would blend into the bread well.  And also because it was sitting on the counter and the thought of another bowl of squash soup is about as appealing as going for a 10km run in a torrential downpour.

Just a heads up: the next recipe you’ll see on here will probably be for squash soup.  Consider yourself warned.

However, if you like leaving your house more than me, you could use grated zucchini (2 c total), or a combo of zucchini, butternut, kabocha, or pumpkin. I won’t judge.

Time for the magic to happen.

Love at first sight?

Not quite; still shy.

Everybody play nice now…just because the eggs didn’t show up doesn’t mean you have to rebel.

Ahh, that’s better.

(I’m not going to lie, I was completely nervous at this point. Embarrassing but true.  Had I made a mistake by not running out to the store to get more eggs????)

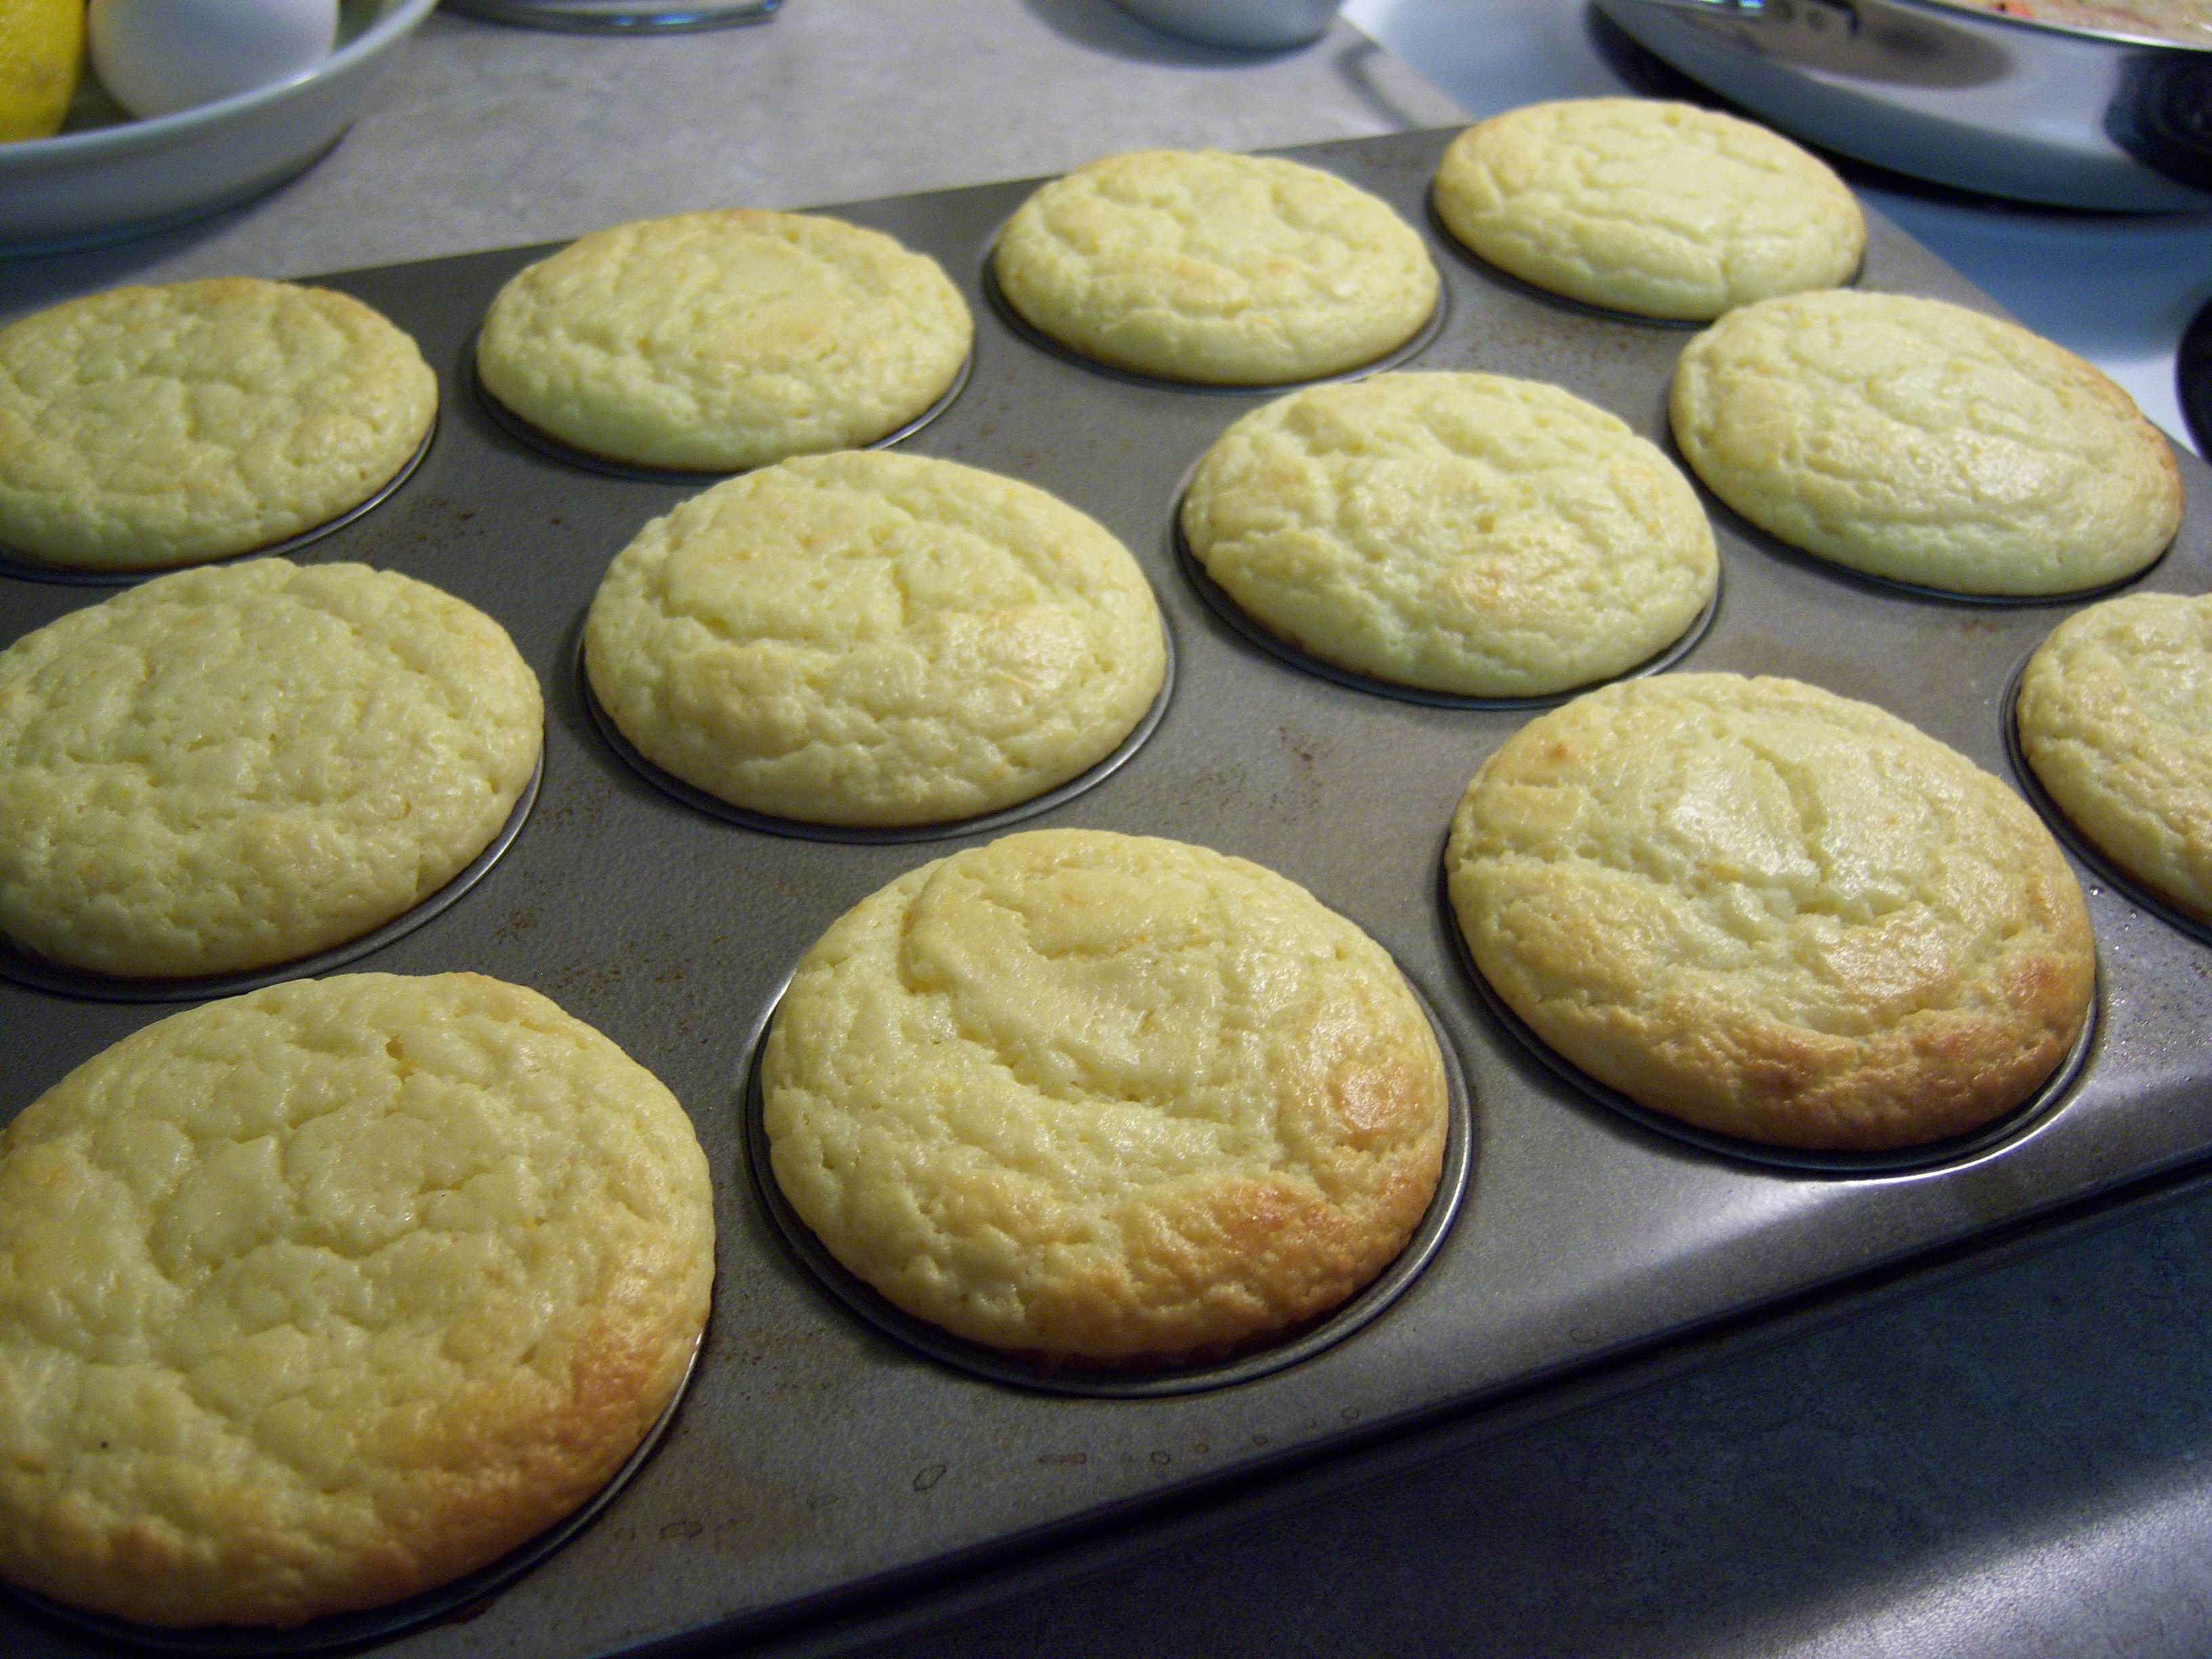
After about 50 minutes at 350-degrees, I would soon find out.

Hmm….smells delicious and looks promising, but how will they hold up once they’re out of their pans?

Dare I say I’m impressed?!?!

The bread rose just fine, and held together beautifully.  It is perfectly moist with really nice warm spice undertones.  Wannabe vegan or not, this sure is a winner in my books.

Wannabe healthy? Try this bread for breakfast or a quick snack instead of an oil and sugar laden bakery muffin or quick bread.

Wannabe frugal? Experiment with what you have on hand instead of buying more.

Wannabe vegan? Yes please!

Chocolate Swirled Peanut Butter Banana Bread

When you were a kid, did your parents ever tell you that TV would rot your brain? I can’t remember if mine did or not – does that mean my brain has already rotted? Either way, I watched more TV than I should have as a child, and (most days) my brain works alright.

A few years ago, I made the decision to go without a TV.  Criticized by many and understood by few, it was the right thing for me at the time.  Truthfully, I haven’t really missed it, with the exception of a few odd times.  Besides, I always told myself that if I really wanted to watch TV, I could just go to the gym.

Let’s just say I haven’t watched much TV since my days of “Who’s The Boss?” and my gym membership has remained mostly unused since 2007.

The other day, I made a grave mistake: I plugged my TV into the wall, and – lo and behold – I have cable. Who knew?!?!

Naturally, I did what any good Martha-wannabe would do and I turned it to the Food Network.  “Recipe for Riches” was on – have you heard of it? I hadn’t, but it is a reality show of sorts.  Contestants were competing for the best cake in Canada, and the winner will have their product reproduced under the Presidents Choice Brand.  They also win $25,00o in prize money, if you’re into that kind of thing.

One of the final 2 contestants made this cake called Banana Chocolate WOW cake, or something to that effect.  It was a banana cake with a chocolate filling, and a white chocolate cream cheese icing.  One of the judges commented that her cake was good because it wasn’t as dense as banana breads usually are (clearly, banana cake shouldn’t be as dense), and I’ll admit that while at the end of the episode neither she or the cake WOW’d me (or the judges; she lost so you can save yourself the hour it would take to watch the episode), it made me decide to share my version of banana bread with you sooner rather than later.

What are your thoughts on banana bread? Mine are that it is usually too dense, too greasy, too light, or not enough banana flavour.  I know, I’m so fickle! Don’t you agree though? Many quick breads suffer from the same ailment, but many have not yet achieved the perfect flavour/texture balance.

Until now that is.  Enter my new love – chocolate swirled peanut butter banana bread.  Because really, isn’t everything better with peanut butter and chocolate? 

Oil (canola or grapeseed), buttermilk, bananas, brown sugar, peanut butter (I like natural), vanilla, AP flour, WW flour, eggs, baking powder, baking soda, salt, cocoa powder, chocolate chips.

In a large bowl, mash 3 large bananas.

Add 3/4 c brown sugar, 1/3 c oil, 1/3 c buttermilk, 1/3 c peanut butter, 2 eggs, and 1.5 t vanilla, and beat until everything is well acquainted.

In a separate bowl, stir 1 c AP flour, 1 c ww flour, 3/4 t baking powder, 3/4 t baking soda, and 1/2 t salt together.

Stir the dry ingredients in by hand until everything is just barely incorporated.

No one will eat your banana bread if you don’t.

Wondering when the chocolate joins the party? Grab yourself about 1 c of batter in a separate bowl, and sift in 2 -3 T of cocoa powder.

That, my friends, is why we sift. Use a spoon to smoosh the cocoa pebbles (is that a cereal? I was deprived as a child so I’m not sure) through the sieve, then use the spoon to do a little QC on the batter.

But wait! There’s more:

In this instance, “more” refers to about 1/3 c of chocolate chunks.  Did I measure? Ya right.

Stir the batter together, and set it aside.

Grease and flour 2 loaf pans (I doubled the recipe when I took pictures – this bread is in high demand – so please don’t stretch this 4 ways unless you have a hidden talent for multiplying banana bread), and pour about 2/3 of the regular batter in.

Dallop most of the chocolate batter on top…

Top it off with the rest of the regular batter, and whatever you left in the chocolate bowl.  Unless of course you thought the rest of the chocolate batter was for sampling, in which case you go right ahead.

Gently swirl the two batters together.  Make sure you use a clean skewer for each pan so the swirls are equally distinct.

Bake at 350-degrees for about 40-50 minutes.  These babies took exactly 42 minutes in mine.  Aren’t you proud Mom? I used a timer!

In the pan, they smell delicious.

But once I sliced into them?

To me, this is the quintessential banana bread – not too light, not too dense, hints of peanut butter, and a rich chocolate swirl.

Claimed by some to be the best banana bread they’ve ever had, all I can say is WOW.

(Note: Recipe adapted from the wonderful Julie.)